 10-11-09, 02:26 PM
|
#1 |
|
BassFishin.Com Active Member

Join Date: Sep 2009
Location: Woodbury Tn
Posts: 119
|
 THE EASY TO BUILD ROD WRAPPING JIG THE EASY TO BUILD ROD WRAPPING JIG 
Materials List: 1"x3"x24" hardwood (2 pieces) 1"x2"x24" hardwood (1 piece) 1"x4"x36" hardwood (1 piece) 1/4"x2" bolts, with washers and wing nuts 1/4"x3" bolts, washers, and self locking nuts 1-1/4" drywall screws Wood glue Felt Stain and finish of choice (if desired) Step 1, The Base From the 1x2, cut three pieces 5 1/4" long. Put one aside for later. Take the two remaining pieces, and glue/screw them to the bottom of the two 1x3 pieces, leaving about a 5/16" gap between the two 1x3's. Be sure to pre-drill and countersink all screw holes to keep from splitting the wood. Set this aside to allow the glue to dry.      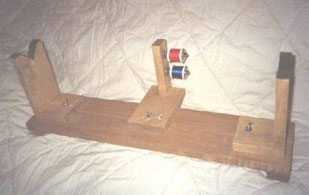 Step 2, The Rod Rests From the 1x4, cut three pieces 6" long, and two pieces 4" long. Set one of the 6" pieces aside for later. Take the two remaining 6" pieces and clamp them together. Mark and cut a “V" notch 1-1/2" deep in one end. Then Glue/screw the uprights (6" pieces) to the 4" pieces. Drill a 5/16" hole in the center of each of the 4" bases.               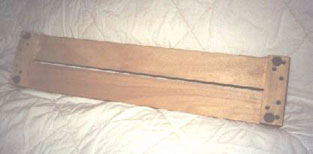 Step 3, Thread Tensioner Now, take the two pieces you set aside earlier. Drill two 1/4" holes in the piece of 1x2, far enough apart so two spools of wrapping thread won't hit each other. On mine, they are 2" apart. Glue/screw the 1x2 to one edge of the piece of 1x4. Drill a 5/16" hole in the center of the 1x4, about 2" from the edge. Thread the 3" bolts through the two holes in the upright, and secure them with a nut. These will hold your spools of wrapping thread. Tension on mine is supplied by two small pieces of surgical tubing (small springs will also work) I had to use the self-locking nuts because the wing nuts I tried kept un-screwing themselves as the spools turned. Washers cut from a thin piece of plastic, and placed on both ends of the thread spools help the thread spools to turn smoothly. I added a small eye screw to the base to feed the thread from the bottom of the rod blank.         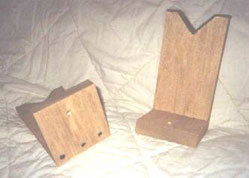 Step 4, Finishing/Assembly Sand lightly (if you feel ambitious, you can use a router on all the edges), stain and apply a coat of your finish of choice. I just sprayed mine with a couple of light coats of matte polyurethane. Glue felt (or the fuzzy half of Velcro) to the “V" notches in the rod rests. I put some on the base to keep from scratching the kitchen table, too. Then use the 2" bolts, washers, and wing nuts to connect the rod rests and thread tensioner to the base. The slot you built into the base is for your adjustments of these three pieces. You should have enough excess wood left to make a separate rod rest (for longer sections or one piece rods). I'm going to make an extra upright for mine, and attach a drying motor, for finishing. 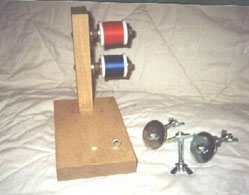 ~Greg Pennell thanks Greg
__________________
When fishin poles are outlawed only outlaws will have fishin poles and Shimano reels. |

|

|
 |
|
Disclosure / Disclaimer
Before acting on the content posted, you should know that BassFishin.Com may benefit financially and otherwise from content, advertising, links or otherwise from anything you click on, read, or look at on our website. Click here to read our Disclosure Policy and Disclaimer. |
| Currently Active Users Viewing This Thread: 1 (0 members and 1 guests) | |
|
|


 Linear Mode

